|
Page Updates
2015-04-02: Fixed images after years of being broken. Fixed a spelling mistake. Updated some markup.
Introduction
Heh, now before you start worrying about wires and such in your CPU socket, know
that when done properly, this trick is entirely safe. I've been using it
for a while now without any problems and it was my first time to try a CPU wire
mod. It isn't unnatural for the CPU, either. It is just as if it
came from the factory with those bridges closed (as other models do come out)
instead of cut with a laser. So long as you exercise a small amount of
caution, you won't have any trouble. If you do manage to kill something by
like shoving a gallon of AS in your pins, please respect your merchant (probably
Newegg) by not RMAing a chip that was fine from the factory and you killed
yourself.Required Disclaimer
DOING ANY OF THESE MODIFICATIONS WILL RESULT IN YOU VOIDING YOUR WARRANTY
(I assume no responsibility for any damages at all.)
If you do them right though, you shouldn't
have any trouble with hardware failures...just
be warned it may be possible though and I am
not responsible for any damages whatsoever.
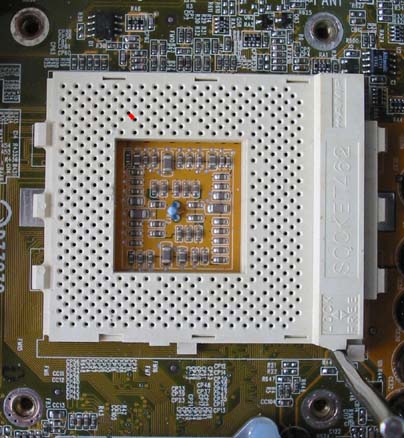
The Socket "A" Socket
The bare bones Socket A socket design looks like this picture:
 (P.S. You can click on ALL of my pics for huge-ass zooms)
I'll modify this same picture to show all of my wire mods so you don't have to
keep guessing what orientation the socket is in or if it is indeed the same
socket at all. These mods are quite simple, but you have to be careful to
do them right. The socket has 462 pins and there is an actual grid with
letters and numbers somewhere, but it is almost impossible for a newcomer to
this task to understand without taking extra, unneeded time.
Force-Unlocking the Lower Multipliers (The Multipliers 12.5 and Down)
Ok, to unlock the lower multipliers, those which are below 13, all you need
to do is get a very small wire, needle-nose pliers (optional but VERY good to
have), and some scissors. Before you actually cut and shape your wire, I
suggest you prepare for the mod by turning off your computer and removing the
heatsink/fan and CPU. The reason I say this is you'll need to know the
correct size to make your miniature U-shaped wire. This page should
actually print out rather well.
Ok, time for the mod:

If you don't have a spool of fine wire around, you can just as easily find a
small multi-stranded wire, strip a long area at the end of such wire, and cut
off a piece of the finer wire wrapped in the twisted bundle. Ideally, the
wire is only about half as big around as a socket pin. Both it and your
CPU's pin have to fit in the same socket...which is not that hard to achieve
with the right wire. Form a U with the wire (or a staple shape |_| ) with
the top part being as wide as the distance between the center of the two holes
you are going to put the wire into on the CPU socket. For example, you may
make the U with about 3-5mm legs and a 2-3mm top.
Once you've formed your U-shaped or staple-shaped wire, attach the pliers (or
your fingers if you feel lucky) to the top of the U/staple. Carefully
insert it into the holes of the marked bridge on the picture above. Once
inserted, all you have to do is insert your CPU back into the socket and
re-attach your heatsink and fan. If you use Arctic Silver, be sure to
reapply it the proper way. YOUR CPU WILL BE HARDER THAN NORMAL TO
INSERT but this is normal. So long as you didn't pick a 2 gauge wire,
you should only have to use a little additional force to make the CPU re-seat.
The wire shouldn't make any pins largely exposed, either. If everything
appears to have gone fine, and you are sure you used the correct holes to
bridge/short/connect/attach, then all you've got to do is fire up your computer
after re-attaching your CPU cooling gear.
Once you start up, you should be able to select and use any multiplier up to
12.5x in your BIOS (if supported).
Force-Unlocking the Higher Multipliers (The Multipliers 13 and Up)
To unlock this range of multipliers, those which are above 12.5, all you'll
have to do is get another wire like in the mod above. I suggest you read
the mod for unlocking the multipliers 12.5 and down and just
bridge/connect/short/attach the two pins shown in the picture below instead of
the one above in the Lower Multipliers mod.
Basically, it is just a mirror of the pins to connect for the lower
multipliers.
DO NOT USE BOTH OF THESE MODS AT THE SAME TIME. Pick
one or the other but not both. If you want to change from low to high or
the opposite, all you have to do is remove the existing mod's wire and insert it
into the other mod's position.
The mod is as simple as you perceive it. If you look at this page and
see all the text thinking, "Wow" then it'll be hard. If you look at the
pictures and figure out the rest by yourself, it will probably be easy. To
sum up the mod into a quickie:
"To unlock 12.5x and down, connect the pins shown in the 1st mod picture.
For 13x up, use the 2nd mod picture."
My Barton is sitting happily at 13x200x1.825v =) That's 2600MHz on air,
folks...thank you
Mobile Barton (link long since dead). Don't get a mobile if you don't run an nForce2 board.
You have been duly warned. |


